


How to create a PDF file?

The PDF format was created to fulfill the dream of a paperless workspace. PDF files can be read and processed on almost any system, so saving PDF files to and from other file types is standard practice. In this article, we’ll tell you about ways to create PDF files. All of the ways to create PDF files are pretty quick and easy. At the end of the day, just choose one of the four options we will show you and you will be fine.
Option #1: How to create a PDF with a PDF printer
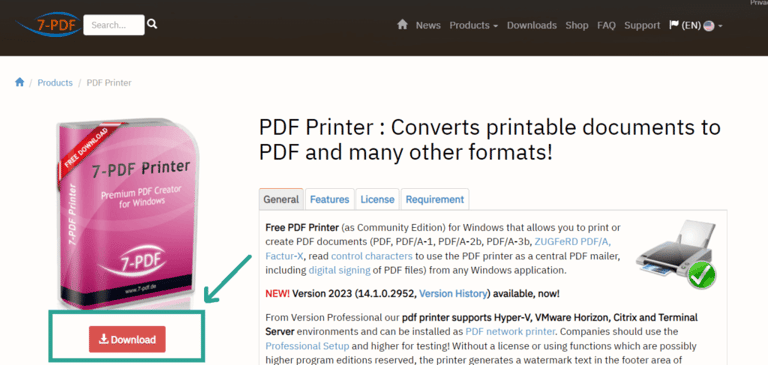
1. Obtain PDF-printer software. Free PDF printer software is widely available, and some examples are PDFCreator, PrimoPDF and 7-PDF Printer (Community Edition). These apps can be found and downloaded online. Paid options such as pdfFactory Pro exist too.
Additionally, it’s possible that you already have PDF printer software installed on your computer, such as “Microsoft Print to PDF”, which is built into Windows 10 and 11. Check for already installed printers on your system before downloading anything.
We recommend you to download the program 7 – PDF Printer

2. Click on “Free Community Edition”. It covers personal and commercial use for up to 10 installs, or 10 named users. If you need more than that, or you want to run the printer on a Citrix or terminal server, check the paid editions.
3. Once the printer is installed, open the document you want to convert and choose File > Print. Pick the PDF printer from the list of printers, click Print, then choose a name and a location for the PDF file.
Option #2: Make use of Acrobat’s “Create PDF” functionality [paid only]
You may simply create PDF files from webpages, contents of the clipboard, photos, and other file types by using the “Create PDF” tool of the paid version of Adobe Acrobat Pro.
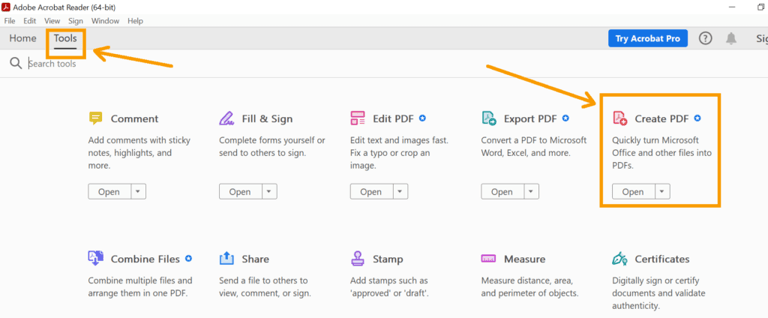
1. Open Acrobat. Select Tools, then choose the “Create PDF” tool. You can simply convert practically any file to a PDF with the “Create PDF” tool.
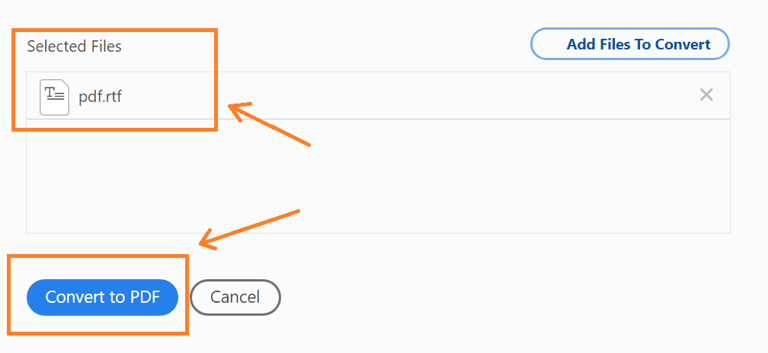
2. Click “Select Files to Convert to PDF” to select the file you want to convert. The application supports the file types Microsoft Word, Excel and Powerpoint as well as a variety of image formats.
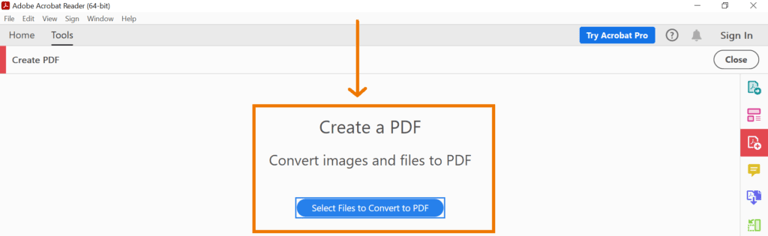
3. You can add more files to convert by clicking on “Add Files to Convert”. When you are ready, click on “Convert to PDF”. The PDF file is produced by Acrobat and saved in the same location as the original. Its file ending is “.pdf” instead of the original file’s ending.
Option #3: How to Create a PDF in Microsoft Word for Mac
For Mac users, the procedure for creating a PDF is slightly different:
- Launch the file you want to convert.
- choose File > Save As.
- Choose where to save the file and rename it.
- Choose PDF from the list of file formats by clicking the File option.
- To save the file as a PDF, select Export.
Change the file name and/or location so that you end up with two files: a Word document you can carry on editing, and a PDF you can share. Microsoft’s own guidance for Word on Mac is to rename the PDF, because reusing the document’s name leaves you with a PDF you cannot change back into a Word document without extra software.
Option #4: How to Create a PDF in Microsoft Word for Windows
You can export a document as a PDF in Word for Windows. How to do it:
- Open the file that has to be converted to a PDF.
- Select File > Export. Make a PDF or XPS
- Choose PDF as your preferred file type.
- Select the optimization level you want (either “Standard” or “Minimum size”).
- Select a name for the new file and a location.
- To generate a PDF file, click Publish.
If you need to update the PDF, you can still make changes to the original document in Microsoft Word and export it again—or upload your Word file directly to MailMergic, as it also supports creating mail merges from Word files. The creation of an XPS file, which is similar to a PDF but a far less popular format, is also possible using this technique. PDF is typically the better option.