Automatically Fill Out PDF Forms from Google Sheets: The No-Code Revolution You Need 🚀
In today’s fast-paced digital world, efficiency isn’t just a buzzword – it’s a necessity. Businesses, educators, non-profits, and individuals constantly grapple with mountains of administrative tasks. Among the most tedious and time-consuming is the manual generation of personalized PDF documents. From invoices and contracts to certificates, consent forms, and personalized letters, the process of copying data from a spreadsheet and pasting it into individual PDF fields can devour hours ⏳, introduce errors ❌, and drain productivity.
But what if there was a better way? What if you could automatically fill out PDF forms from Google Sheets with unparalleled ease, requiring absolutely no code needed?
“Can I auto-fill this PDF from my Google Sheet data?”
Welcome to the future of document automation with MailMergic. This powerful, intuitive platform is designed to revolutionize how you handle PDF documents, transforming your raw data into polished, personalized files ready for instant distribution or secure storage.
The Inefficiency of Manual PDF Population: A Common Pain Point 😩
Consider these common scenarios that illustrate the inefficiency of traditional methods:
- Small Businesses: Sending out monthly invoices to hundreds of clients, each requiring specific order details, names, and addresses. 🧾
- HR Departments: Generating offer letters, onboarding documents, or policy acknowledgments for new hires. 📄
- Educational Institutions: Creating personalized certificates of completion for thousands of students after a course or event. 🎓
- Real Estate Agencies: Populating rental agreements or property disclosures with tenant and property-specific information. 🏠
- Event Organizers: Sending personalized welcome packets or tickets to attendees. 🎉
- Non-Profits: Crafting individualized donor receipts or volunteer agreements. ❤️
In each case, the core data often resides in a spreadsheet – a Google Sheet, an Excel file, or a CSV. The bottleneck isn’t the data itself, but the labor-intensive, error-prone process of transferring it into structured PDF formats. This repetitive work not only wastes valuable time but also introduces the risk of typos, missed fields, and inconsistencies, which can have significant professional and legal repercussions. ⚠️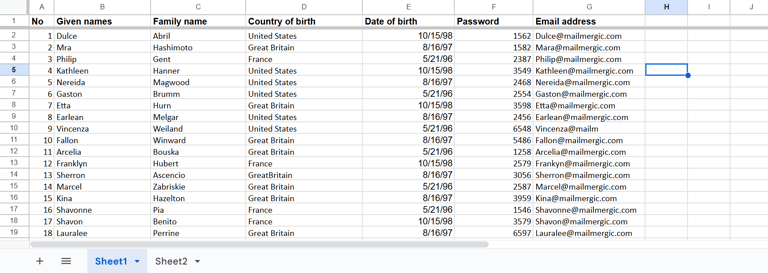
Embracing the No-Code Revolution: Why It Matters ✨
The concept of “no code” has emerged as a game-changer for non-technical users, democratizing powerful automation tools that were once the exclusive domain of developers. For automating PDF generation, a no-code approach means:
- Accessibility: Anyone, regardless of their technical background, can set up complex workflows. You don’t need to learn Python, JavaScript, or any specialized scripting language. 🧑💻
- Speed: Go from idea to implementation in minutes, not days or weeks. ⏱️
- Cost-Effectiveness: Avoid the expense of hiring developers or purchasing complex, enterprise-level software. 💰
- Empowerment: Focus on your core business or tasks, rather than getting bogged down by manual administrative work. 💪
MailMergic embodies this no-code philosophy, making sophisticated PDF automation accessible to everyone.
🔧 What You’ll Need
To follow this guide and start automating your PDF forms, make sure you have:
- ✅ A fillable or non-fillable PDF form (ideally with AcroForm fields for easiest setup, or any PDF)
- ✅ A Google Sheet with your data (e.g., columns for name, email, address, invoice number, etc.)
- ✅ A free MailMergic account (or a Pro plan for advanced features and higher limits)
- ✅ A Zapier account
Unpacking the Powerful Workflow: From Google Sheets to Automated PDFs with MailMergic & Zapier 🚀🔗
The true power of MailMergic shines when combined with Zapier, allowing you to create dynamic, automated workflows starting directly from your Google Sheets. This isn’t just about filling forms; it’s about building a seamless, hands-free document generation system. Here’s a detailed, step-by-step guide to setting up this incredible automation, with no code needed:
Phase 1: Setting Up Your MailMergic Template (The Foundation) 🏗️
Before Zapier can work its magic, you first need to prepare your PDF template within MailMergic. This one-time setup ensures MailMergic knows exactly how to personalize your documents.
- Upload Your PDF File & Create a Template (Wizard Step 1): Your journey begins in MailMergic. Upload the PDF file you wish to automatically fill out. This could be an invoice, a certificate, a contract, or any other document. Once uploaded, MailMergic automatically recognizes it as a new template, ready for customization. ⬆️

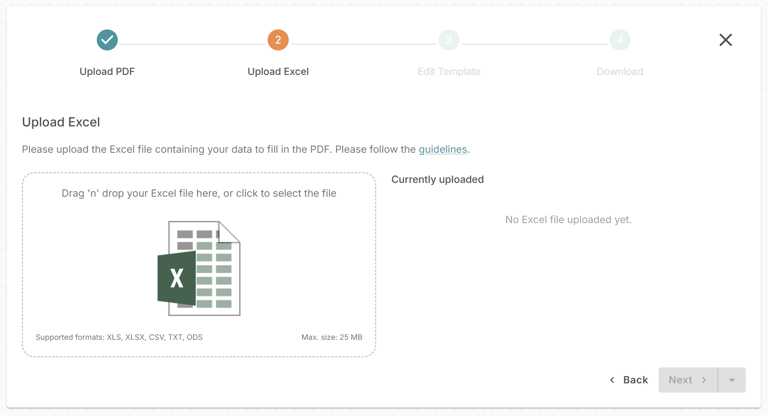
- Upload an Exemplary Excel File (Wizard Step 2): Next, provide MailMergic with an example of your data structure. Upload an exemplary Excel file (or CSV, Google Sheet link). This step is crucial because it tells MailMergic what data fields (placeholders) it can expect to receive from your Google Sheet later on. You only need to do this once per template. 📊
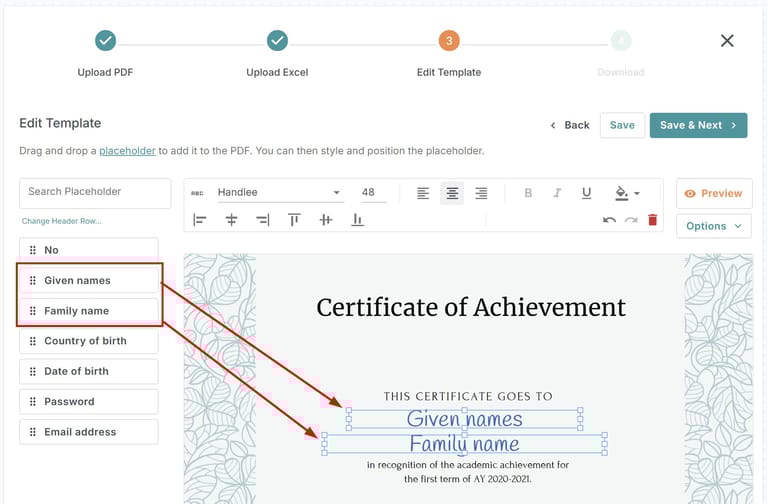
- Drag and Drop Placeholders to Your PDF (Wizard Step 3): Now for the creative part! Within the MailMergic template editor, you’ll see the placeholders derived from your exemplary Excel file. Simply drag and drop these placeholders onto your PDF template exactly where you want the data to appear. You have full control to style and customize these placeholders, including font, size, color, and position. What’s more, you can add advanced dynamic elements like images, fields for electronic signatures ✍️, QR codes, and more, all populated by your data. 🎨
- Create a Mail Merge in MailMergic & Verify Output (Wizard Step 4): Before connecting to Zapier, it’s good practice to run a test mail merge directly within MailMergic. Click on “Generate files” (found in wizard step 4). Use a small sample of your data to check if the output PDFs perfectly match your expectations. This ensures your template is flawless before automating. ✅
Phase 2: Connecting the Automation Dots with Zapier 🌐
Once your MailMergic template is perfectly set up, it’s time to link it to your Google Sheet using Zapier, the powerful no-code automation platform.
- Create Your Zapier Account: If you don’t already have one, sign up for a Zapier account. This platform will serve as the bridge connecting your Google Sheet to MailMergic, and then to other apps. 🔗
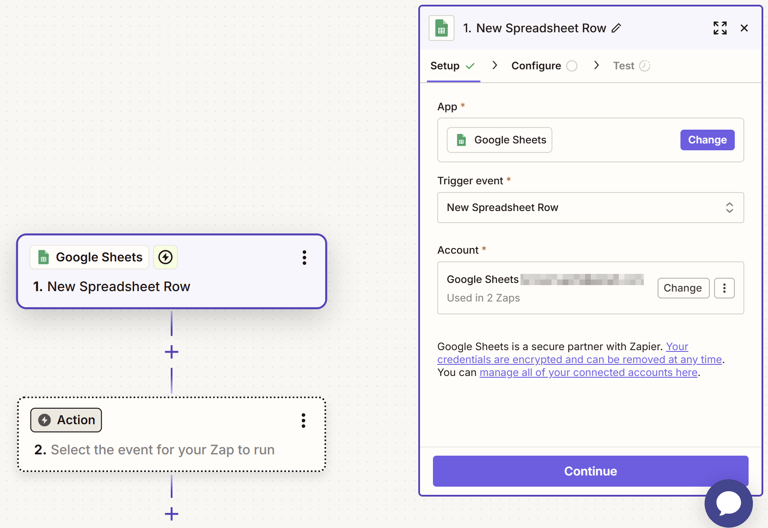
- Connect a Google Sheet as a Trigger in a Zapier Workflow: In Zapier, start building a new “Zap.” Your trigger will be “Google Sheets,” specifically selecting the event “New Spreadsheet Row” (or “New or Updated Spreadsheet Row” if you prefer). This means your automation will kick off every time a new row is added at the bottom of your designated Google Sheet. For seamless matching in later steps, ensure your Google Sheet’s column headings are the same as those in the exemplary Excel file you previously uploaded to MailMergic. 📊➡️
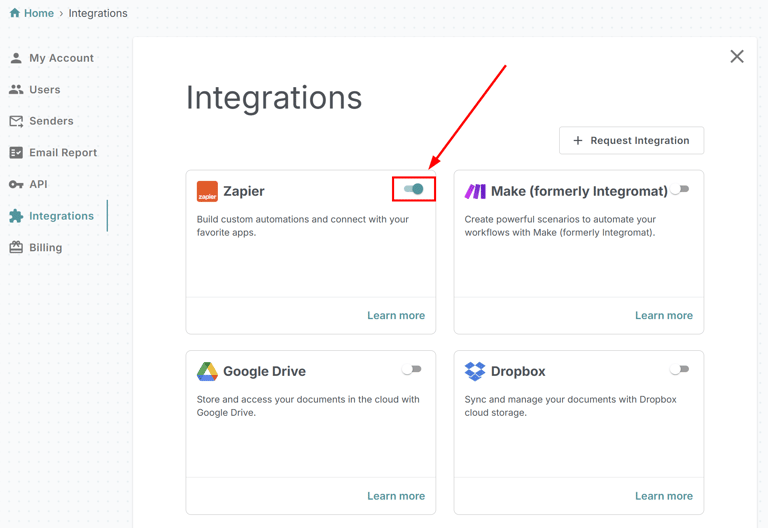
- Connect the MailMergic Action in Zapier: “Run Mail Merge”: Now, add an action step to your Zap. Search for “MailMergic” and choose the action “Run Mail Merge.” To connect your MailMergic account, you’ll need to authenticate it using the API Key. This key is securely provided in the “Integrations” page within your MailMergic account. Make sure you’ve activated the Zapier integration within MailMergic to receive this key! 🔑
- Configure the Zapier Action: Template & Placeholders: In the MailMergic Action configuration within Zapier, you’ll select the specific MailMergic template you prepared earlier (from Phase 1). Then, you’ll match the placeholders from your MailMergic template with the corresponding columns from your Google Sheet (the trigger data). You’ll also specify the output filename for the generated PDF, often using dynamic data from your sheet (e.g.,
[Customer Name]-Invoice-[Invoice Number]). Do not include the file ending.pdfto the filename, as it will be added automatically.✍️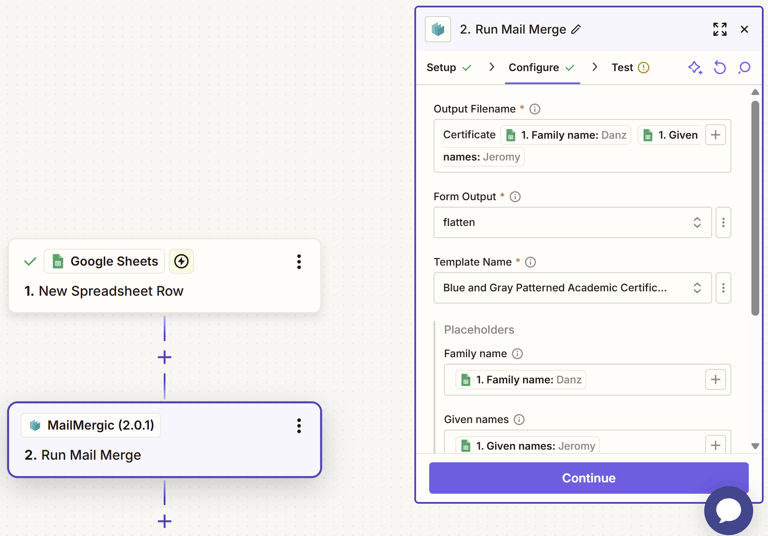
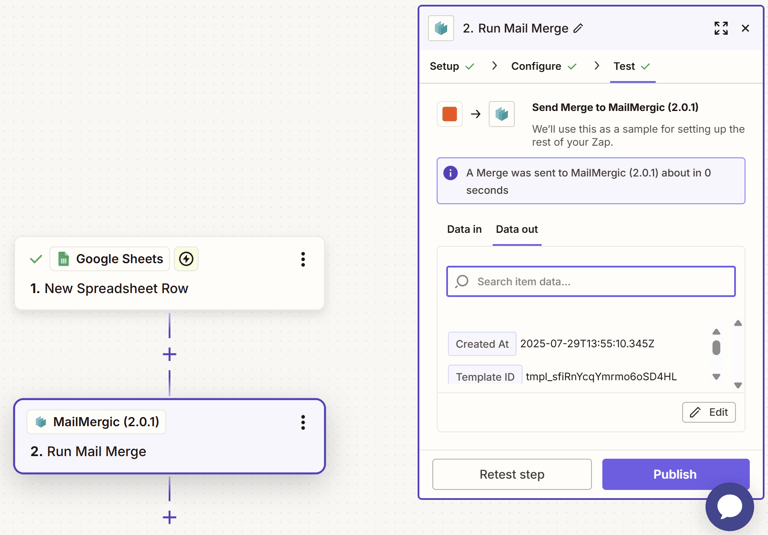
- Test the Step: Zapier allows you to test each step of your workflow. Run a test for the MailMergic “Run Mail Merge” action. This will process a sample row from your Google Sheet and attempt to create a PDF. Check the results in the “Data out” tab to ensure the file was generated correctly. If you encounter any issues, don’t hesitate to reach out to the MailMergic support team for assistance! 🧪
- Unleashing Endless Post-Merge Possibilities (Additional Actions):
The real power of Zapier! After the MailMergic step successfully generates your PDF, you can add any number of subsequent actions to further process the generated PDF. To access the actual file for the next step, you must choose the “URL” field provided by the MailMergic action. This URL contains a link to your newly created PDF. Please note, for security reasons, this is a signed URL and is only valid for approximately 5 minutes.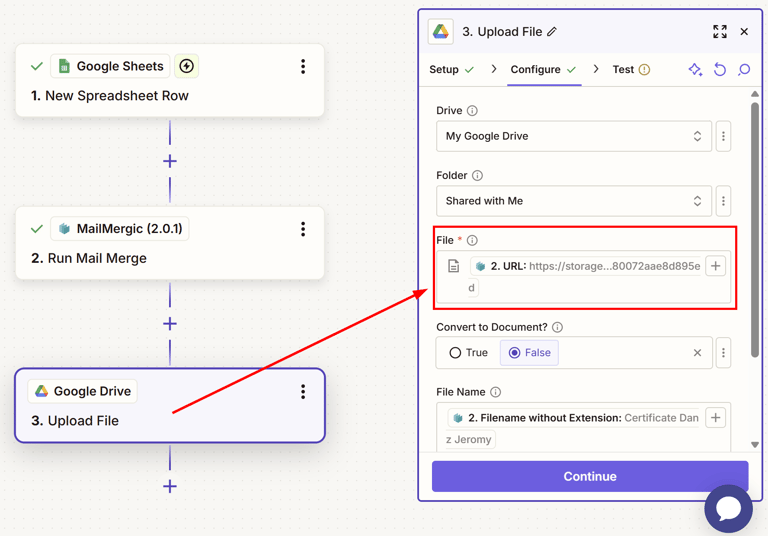
The possibilities are truly endless, allowing you to fully automate your document lifecycle:- Upload your file to Google Drive or Dropbox: Use the generated URL to automatically save the PDF into a specific folder in your cloud storage. 📁
- Send the PDF via Gmail/Outlook: Attach the personalized PDF (using its URL) to an email and send it to recipients whose email addresses are in your Google Sheet, even customizing the subject and body. 📧
- Update a CRM (e.g., Salesforce, HubSpot): Log the document generation event or attach the PDF to a contact record. 📈
- Notify your team in Slack or Microsoft Teams: Get alerts when a new document batch is generated. 🔔
- Add an entry to an accounting system (e.g., QuickBooks): Automatically log invoices once generated. 💰
- Create a task in a project management tool (e.g., Asana, Trello): Assign follow-up actions related to the document. ✅
- Send an SMS notification: Alert a recipient that their document is ready. 📱
This comprehensive workflow transforms what used to be a laborious, manual chore into a streamlined, automated process, putting the power of advanced document generation right at your fingertips, with no code needed.
Why Choose MailMergic for Your PDF Automation Needs? ✅
The market offers various tools, but MailMergic stands out for several key reasons, especially when it comes to Google Sheets to PDF automation:
- True No-Code Experience: Unlike some solutions that still require basic scripting or complex configurations, MailMergic is built from the ground up to be truly intuitive. If you can use Google Sheets, you can use MailMergic. 👍
- Designed for Scale: Whether you need to process a handful of PDFs or tens of thousands, MailMergic is built for high-volume automation without compromising performance or accuracy. 🚀
- Unmatched Flexibility with PDFs: MailMergic works with virtually any PDF. It doesn’t matter if your PDF has existing form fields or if it’s a static image document; MailMergic provides the tools to insert data precisely where you need it. 📐
- Cost-Effective Solutions: With various pricing tiers, including a generous free plan, MailMergic offers an affordable entry point for individuals and scales up to meet the demands of large enterprises. 💲
- Robust Security & Privacy: We understand the sensitive nature of your data. MailMergic adheres to strict security protocols, ensuring your information and documents are protected. For ultimate data sovereignty, our Offline Plan even allows 100% local processing. 🔒
- Dedicated Support: Our team is committed to helping you succeed, providing responsive support whenever you need assistance. 🤝
- Continuous Innovation: We are constantly enhancing MailMergic’s features, including seamless integrations with popular tools like Zapier, expanding your automation possibilities even further. 💡
Beyond the Basics: Advanced Applications & Use Cases 🌟
The core Google Sheets to PDF workflow is incredibly powerful, but the applications extend far beyond simple form filling:
- Automated Reporting: Generate monthly performance reports for clients, populated directly from your sales or analytics data in Google Sheets. 📈
- Event Management: Create personalized QR code tickets for attendees, pulling data from registration forms, and automatically email them. 🎟️
- Legal & Compliance: Generate legal documents like NDAs or service agreements, pre-filled with client details and terms, ensuring consistency and compliance. ⚖️
- Onboarding Processes: Automate the creation of new employee welcome packets, including personalized handbooks and initial forms, all triggered by a new row in your HR Google Sheet. 🆕
- Financial Statements: Produce customized payment reminders, invoices, or bank statements for customers. 🏦
- Certificates & Awards: Design beautiful certificates that automatically pull student names, course titles, dates, and unique certificate IDs from your spreadsheet. 🏆
Each of these scenarios benefits immensely from the automate PDF generation capabilities of MailMergic, saving countless hours and eliminating the potential for human error inherent in manual processes.
Get Started Today: Embrace No-Code PDF Automation 🎉
The era of manual, repetitive PDF generation is over. By leveraging the data you already have in Google Sheets and the intuitive power of MailMergic, you can streamline your workflows, enhance accuracy, and reclaim valuable time. ⏱️
Stop wrestling with cumbersome documents and start focusing on what truly matters for your business or project. Discover the simplicity and power of automatically filling out PDF forms from Google Sheets with no code needed.
Join the thousands of users who are already transforming their document workflows. Explore MailMergic today and experience the future of PDF automation – where your data works smarter, not harder. ✨